Quantcast
Channel: Knowledgebase – Lightspeed Systems Community Site
Viewing all 56 articles
Browse latest View live

What to do if Website Access is Allowed but some Content is still Blocked

$
0
0

Many websites either link to outside material or use another domain name for content delivery. Both Facebook and Pinterest are examples of websites you may intend to allow for some end users but run into an issue where the domain continues to be blocked or portions of it are note displayed. In this article we will examine Pinterest.com and explain how we can use the built in Web Filter reports to identify the websites being blocked even though the intended website has been allowed.

First make sure Pinterest.com has been moved to an allowed category for the policy in place.

1. Navigate to Web Filter -> Categorized Sites and search for Pinterest.com

123

2.Verify the Category the site is in. This will typically be a custom category such as Teach Allow (but it could be the default of Adult if the policy in use has access to this category, for this discussion we will assume the Adult category is not allowed and a custom category is in use)

124

3. Navigate to Policy Management -> Rule Sets

125

4. Select the Policy in place and verify the category Pinterest is classified in is set for allow.

5. From your test client navigate to Pinterest.com and view the website making note some items may blocked such as the pins. This occurs because they are hosted from the Pinterest content delivery domain called pinimg.com. This site will need to be reclassified as well.

Evaluate the web activity report to determine what domain is being blocked

1. Navigate to Reports -> Web Filter: Details -> Activity Logs

126

2. From Data Options select Action/Blocked and User/IP address of the device you are currently using

3. Click Generate

128

4. From this report you will be able to see a URL string with the pinimg.com domain being blocked as it is still in a blocked category while Pinterest was moved.

5. To reclassify this site simply click on the URL in destination column, select categorize and then under results click the domain. Depending on the length of the URL, an exact match may not be identified. If this is the case then remove everything except the top level domain, select search, review the category the site is in, then reclassify as appropriate.


How to use Reports to Identify Blocked Sites

$
0
0

Web Filter reports can be a valuable resource in identifying blocked sites.

Users can specifically utilize the Activity Log report in order to identify which sites are blocked, and for which users.

The following steps illustrate how to use an Activity Log report in order to identify blocked sites.

1. Within the Lightspeed Rocket Console, navigate to Reports -> Web Filter: Details -> Activity Log

Act1

2. Under Data Options on the right hand side, select Action, and then select Blocked. 

Act2

3. If you wish, select Destination and type in the address of the website you are verifying. The following example uses www.facebook.com.

Act3

4. If you wish, select the time range for the report. The default is set to Last 7 Days.

Act4

5. If you want to determine if a site is blocked for a specific user, then select User and type out the user name.

Act5

6. Click Generate. The report will display the site blocked, the reason for the block, the specific user, the IP address, the origin, and the time of the blocked access.

Act6

The following video briefly demonstrates how to use the Web Activity report to identify blocked sites.

Peer to Peer (P2P) Blocking and Exclusions Explained

$
0
0

Peer to Peer (P2P) networks are commonly used for file sharing and instant messaging. In most cases, P2P networks have no educational function and can potentially compromise your network. The Lightspeed Web Filter allows you to easily block all P2P traffic with the click of a button. We do, however, understand that at times P2P traffic is necessary (ex. Skype sessions, some types of internal and external messaging, etc.) We give you the option to add P2P exclusions to exclude specific external IP addresses and ports from being blocked as P2P traffic.

Blocking P2P Traffic

All P2P traffic can be easily blocked through the Web Filter.

1. Within the Lightspeed Rocket Console, navigate to Web Filter and then to General.

P2P1

2. Under the General settings, navigate to Inline Filter and check the box next to Block P2P Networks.

P2P2

You have now successfully blocked all P2P traffic.

P2P Exclusions

You can use P2P exclusions to exclude specific external IP addresses and ports from being blocked as P2P traffic. The following steps will show you how to add, edit, and delete P2P exclusions.

Adding a P2P Exclusion

  • 1. Click Web Filter, then click General.
  • 2. On the General page, scroll down to P2P Exclusions.

r3-00119

  • 3. In the P2P Exclusions grid, click the green “+” icon. This action opens the following page:

Adding P2P Exclusion

  • 4. In the Add P2P Exclusion form, edit the fields as needed.
  • 5. Click Save to apply your changes, or click Cancel to discard your changes and return to the previous page.

Configurable Fields on this Page

  • External IP Range/Mask – Enter an IP address or range in this field in the following format.
192.168.1.0 single IP address
192.168.1.0-192.168.1.254 range of IP addresses
192.168.1.0/24 CIDR notation for same range as above
  • All External IPv4 Addresses – Select (check) to allow P2P traffic to all IPv4 addresses
  • All External IPv6 Addresses – Select (check) to allow P2P traffic to all IPv6 addresses
  • Port – Enter the TCP/UDP port number to enable for P2P traffic.
  • All Ports – Select (check) to enable P2P traffic on all ports.
  • Description – Enter a brief description for this exclusion.

The following video illustrates how to add a P2P exclusion.

Editing a P2P Exclusion

  • 1. Click Web Filter, then click General.
  • 2. On the General page, scroll down to P2P Exclusions.

r3-00823

  • 3. Click the name to edit the item. This action opens the following page:

Editing P2P Exclusion

  • 4. In the Edit P2P Exclusion form, edit the fields as needed.
  • 5. Click Save to apply your changes, or click Cancel to discard your changes and return to the previous page.

Configurable Fields on this Page

  • External IP Range/Mask – Enter an IP address or range in this field in the following format.
192.168.1.0 single IP address
192.168.1.0-192.168.1.254 range of IP addresses
192.168.1.0/24 CIDR notation for same range as above
  • All External IPv4 Addresses – Select (check) to allow P2P traffic to all IPv4 addresses
  • All External IPv6 Addresses – Select (check) to allow P2P traffic to all IPv6 addresses
  • Port – Enter the TCP/UDP port number to enable for P2P traffic.
  • All Ports – Select (check) to enable P2P traffic on all ports.
  • Description – Enter a brief description for this exclusion.

The following video demonstrates how to edit a P2P Exclusion

Deleting a P2P Exclusion

  • To delete (permanently remove) an item, mouse over the item you wish to remove, then click the X on the right side of the row. You will be prompted to confirm the action.

Deleting P2P Exclusion

Caution: Items deleted this way are permanently removed, and cannot be recovered.

The following video demonstrates how to delete a P2P Exclusion

Which Web Filter Report to Use to Determine which Users use up the Most Traffic

$
0
0

The Web Filter comes with in-depth reporting capabilities. You can utilize the Web Filter’s reporting functions in order to determine which of your users uses up the most traffic. This report can be helpful to determine if a user is engaged in unwanted behavior, if all policies are in place, and for general bandwidth management.

In order to see which user uses up the most bandwidth, you will need to run the Web Filter: Traffic by User report.

1. Within your Lightspeed Rocket Console, navigate to Reports and click on Web Filter: Traffic

WFReports1

2. Scroll down and select Traffic By User. The following will appear. Select your desired date range on the top right and click Generate.

WFReports2

3. Once the report is generated, you will be able to see incoming, outgoing, and total traffic by user. The report will automatically sort the users from highest to lowest traffic. You can click each individual category (user, incoming, outgoing, and total traffic) in order to sort by that individual category. You also have the option to sort by individual user by clicking the User filter field on the right and re-generating the report.

WFReports3


The following video briefly illustrates how to run a Web Filter: Traffic by User report.


Lightspeed Ports

$
0
0

The following tables identify which ports you need to open in order to use Lightspeed System’s products. For security reasons, only the following ports should be open. Firewalls should not be configured with any port/any address rules inbound to the server as this will leave the server vulnerable to attacks from outside sources. If through troubleshooting procedures an any/any rule is put in place, it must be removed once testing has been completed.

Lightspeed Systems Rocket Port Cheat Sheet

Inbound Ports Outbound Ports Internal Ports
TCP-80 HTTP from anywhere (needed for mobile filtering,  Launch, and SIS Imports) TCP-80 HTTP to ddb.lightspeedsystems.com and ddb.lsfilter.com (needed for filtering)


TCP/UDP-1305 LTDP lookup (interrogation)


TCP-8080 Proxy (if you are using the Proxy Server) UDP-1311 (needed for filtering)
These must be stateful UDP connections in the firewall; otherwise, you will need an inbound rule to allow UDP with a source port of 1311.
TCP/UDP-1306 Identification Server Service; UA reporting, and Identification Subscription
TCP-25 SMTP (if you are using the Spam module) TCP-80 HTTP to keys.lightspeedsystems.com (needed for licensing) TCP/UDP-1307 Reporting (used between parent and children appliances)
TCP-1999 to bsdupdate01.lightspeedsystems.com (needed for monitoring) TCP/UDP-1310 Policy (used between parent and children appliances)
TCP-80 HTTP to updates.lsfilter.com (needed for updates) TCP/UDP-15868 If using the Websense filtering protocol with a firewall


UDP-123 for date/time sync TCP-110 POP Archive module (if using the POP archiver on an internal mail system)
TCP-25 SMTP (needed for reports and the Spam module)
TCP-110 POP (Archive module if using a hosted mail service)
TCP-20 FTP (Spam module)
TCP-21 FTP (Spam module)


Lightspeed Systems Mobile Manager Port Cheat Sheet

All Operating Systems iOS Android Hosts
TCP-80 – this is the basic port used for internet and should be accessible (filtered ok) for devices to work properly. Please refer to the following Apple knowledgebase article for information on ports used by iOS devices:

https://support.apple.com/en-us/HT202944

TCP-5228-5230 to any out (used to communicate to GCM servers)


https://ls-pki.css-security.com/


lsmdm-production.s3.amazonaws.com

http://lsurl.me


Lightspeed Systems Classroom Orchestrator Port Cheat Sheet

Hosts
  • api.mybigcampus.com
  • *.lsmdm.com
  • lsorchestration-production.s3.amazonaws.com
  • *.pubnub.com
  • Cdn.lsclassroom.com

How to Update an Apple DEP Token

$
0
0

Use the following information to replace an expired Apple DEP (Device Enrollment Program) service token or to update an existing token.

You will need to update the token in both Mobile Manager and through Apple’s interface.

Updating Apple DEP Token in Apple’s Interface

1. Login to your Apple DEP account at deploy.apple.com

2. Navigate to Manage Servers under Device Enrollment Program and click the server associated with Lightspeed Systems

3. The Server Details popup will appear. In it, click on Generate New Token. 

Screen Shot 2016-06-07 at 9.47.02 AM (2)


4. The Generate New Server Token popup will appear. Click on the blue Your Server Token box. This will download the server token onto your computer.

Screen Shot 2016-06-07 at 9.47.21 AM (3)

Updating Apple DEP Token in Mobile Manager

1. Open Mobile Manager and navigate to Settings.

screenshot-lsmdm.com 2016-06-07 13-55-59

2. Navigate to Apple DEP.

screenshot-lsmdm.com 2016-06-07 14-09-38

3. Click Update Credentials. 

screenshot-lsmdm.com 2016-06-07 14-10-27


4. The following popup will appear. Navigate to the directory where you downloaded your Apple DEP server token in the previous steps and click Add Credentials. 

screenshot-lsmdm.com 2016-06-07 14-11-22

You will receive a confirmation that your credentials have been updated!

Learn more about Apple’s Device Enrollment Program here.

Read the Apple DEP FAQ here.

Upgrading the Lightspeed Systems Rocket from 2.x to 3.x

$
0
0

Overview

This Knowledge Base (KB) article provides instructions for upgrading a Lightspeed Systems Rocket Appliance from 2.x to 3.x. This upgrade is designed to keep all of your data intact. However, you should make sure you have a current backup copied off of your appliance before proceeding.

Warning

This upgrade should only be performed by IT personnel who are knowledgeable about the Lightspeed Systems Rocket appliance. Do not perform these instructions unless you fully understand them and feel comfortable about performing them.

Prerequisites

You must have the following to perform this upgrade:

  • A Lightspeed Systems Rocket or Bottle Rocket Appliance
  • A PC running Windows XP, Vista, 7 (32bit only), or 8 (32bit only)
  • A thumb drive (can be the blue Lightspeed USB, a Kingston, SanDisk or Memorex brand of at least 2GB)

Upgrade Steps

Follow the steps below to upgrade your Rocket appliance from 2.x to 3.x.

Step 1: Download Upgrade Files from the Lightspeed Systems FTP Site

Notes:

  • Both downloaded files must be locally on the PC the USB is in.
  • The Win32DiskImager utility is a Windows 32bit only app. It will only function on a 32bit OS.
  • Running the Win32DiskImager will reformat the USB.

Step 2: Insert the Thumb Drive

    • 1. Insert the your thumb drive into a USB port on your PC. The following window will be displayed.

Insert Thumb Drive

  • 2. Click Cancel.

Please note if you examine the properties of the thumb drive the following may be displayed.

Size Mismatch

Other systems may indicate that there is a size mismatch. Both of these messages are due to incompatibilities between Unix and Windows and do not indicate any type of problem and can be safely ignored.

Step 3: Prepare the Thumb Drive with the Web Filter 2.x Image

    • 1. Double-click the Win32diskImager icon to run the image writer utility. The following window will be displayed.

Win32 Imaging software

    • 2. Click the folder icon and navigate to the image file’s location. The following window will be displayed.

Win32 Imaging select file

    • 3. Select the image file and click Save.
    • 4. Select the thumb drive letter from the Device dropdown list. (Verify — this will reformat the drive that is selected)
    • 5. Click Write as shown below.

Win32 Imaging Click Write

    • The following window will be displayed.

Win32 Imaging Confirm

    • 6. Click Yes. When the utility is finished the following window will be displayed.

Win32 Imaging - Done

  • 7. Click Exit.
  • 8. Remove the thumb drive from the PC.

Backing Up

Just in case, it is recommended you run a manual Full backup, AND take a copy “off” of the Rocket, before beginning!

  • 1. Administration –>Backup & Restore –>\[Full] –>\[Backup Now\]
  • 2. Then go to Administration –>Root –>Network Share –>SMB Path (access via your OS, for Windows you may need to map the drive)
  • 3. Navigate to the \backup\manual folder and copy the xxx_xxx_xxx.lsb file to someplace off the Rocket server.
  • 4. Also note what your Management NIC’s IP, Mask, Gateway, DNS info is from the Administration –>Network Interfaces page.

Connectivity During the Upgrade

In the UI go to Web Filter –>General. Make sure you have the Bypass on failure enabled (check box on). Click Save. This will allow Internet connectivity during the upgrade and is needed for License verification. You can go back and reset after the upgrade is complete.

Step 4: Install the v2.x Image File on the Rocket Appliance

    • 1. Power down or restart the appliance.
    • 2. Plug the thumb drive into the Rocket appliance.
    • 3. Power up or start the appliance. The following screen will be displayed.

Initial Screen

Note

If this message does not appear try restarting and pressing F11 at the initial splash screen so you are prompted with an option to boot off of the thumb drive. If problems persist contact Support for additional help.

    • 4. Click Enter. The following screen will be displayed.

Save exisiting data

    • 5. Make sure Yes is selected and then click Enter. This will start the install.

Note:

The installation process will take several minutes to complete.

    • The following screen will be displayed.

Complete

  • 6. Remove the thumb drive.
  • 7. Click Enter. This will restart the appliance.

The upgrade from 2.x to 3.x is now complete.

Web Filter Deploy

$
0
0

The Deploy button pushes or “deploys” your Web Filter settings. You have to click the Deploy button in order for your settings to take effect within Web Filter.

The Deploy button is located on the top right navigational menu.

Dep1

When you click the Deploy button, you will be prompted if you wish to deploy the changes. Click the blue Deploy button to confirm.

Dep2

Important! Remember that you still need to Save your changes by clicking the green Save button at the bottom right of your screen.

dep3

Once your changes are saved, you will be notified that they are ready to be deployed.

Dep4


Email Manager Manual

$
0
0

Support for Email Manager is now provided by Vex Ward Technologies. Visit their website at http://vexwardtech.com/ for Email Manager and Power Manager manuals and support.

You can also download the full Email Manager manual, in PDF format, here:

Email Manager Manual

Rocket 3.x and User Agents

$
0
0

The recent release of Rocket 3 has many of our users asking if they can still use their old user agents. While most of the user agents will still work, any customer running version 3 of the Rocket needs to upgrade to the LMA User Agent for Windows for their user resolution purposes. Lightspeed Systems will no longer support the PC User Agent for Windows devices connected to a Rocket 3 interface.

You can download the latest LMA User Agent here.

Why Are We Doing This?

The Windows LMA User Agent uses a new secure protocol to communicate with the Rocket. In the new protocol all data between the client machine and the Rocket appliance is encrypted. This makes the LMA User Agent safer and more effective than previous versions.

How About Customer With Rocket 2.x?

Customers with Rocket 2.x should run the PC User Agent for Windows user resolution.

You can find the PC User Agent, as well as other user agents, here.

Web Filter 3 Webinar

$
0
0

Sorry, you don’t have access to this content. Please log in or contact a site administrator for help.

Investigative Reporting Service

$
0
0

With lots of data to process, some reports can take several minutes or even hours. If you’ve started a report and it isn’t complete after 30 minutes, please complete this form to have our team run a report for you.

Orchestrator features by OS

$
0
0

Classroom Orchestrator is our classroom management solution, giving teachers the ability to easily manage a whole class of students on devices while giving IT admins controls to ensure network performance and safety.

Classroom Orchestrator supports Windows and ChromeOS. iOS is not supported due to Apple restrictions. Apple’s Classroom app became available with iOS 9.3.

Capabilities vary by OS because we are limited by what the manufacturer allows us to control. This table outlines the functionality for Windows and ChromeOS.

Feature Windows ChromeOS
View Student Screens Fully Supported No Restrictions Fully Supported No Restrictions
Zoom on Screen Fully Supported No Restrictions Fully Supported No Restrictions
Record Student Screens Fully Supported No Restrictions Fully Supported No Restrictions
Open a Browser on Student Device to a specific link Fully Supported No Restrictions Fully Supported No Restrictions
Push Browser shortcut to student device Fully Supported No Restrictions Fully Supported No Restrictions
Lock Devices Fully Supported No Restrictions Fully Supported No Restrictions
Unlock Devices Fully Supported No Restrictions Fully Supported No Restrictions
Broadcast Teacher Screen to Students Fully Supported No Restrictions Fully Supported No Restrictions
Broadcast Student Screen to Students Fully Supported to Other Windows Devices Fully Supported No Restrictions
Admin Cache and Refresh Settings Fully Supported No Restrictions Fully Supported No Restrictions
Send File to a Student Fully Supported No Restrictions Not Supported
Remote Control Fully Supported Not allowed by Google for ChromeOS Devices
View Active Browser Tabs Not Supported Fully Supported No Restrictions
Close Active Browser Tabs Not Supported Fully Supported No Restrictions
View URL History Reports Not Supported Requires Relay license

How does Hierarchy with Restrictions work?

$
0
0

Lightspeed Systems Mobile Manager is set up the same way your educational institution is set up, in a hierarchical fashion, which is part of what makes it such a powerful solution for schools. The top level is your Organization, followed by your Groups. Setting up your devices in this way gives you the most flexibility to configure your settings to work the way your organization works, allowing smaller groups down the hierarchical tree to be configured especially for their needs without affecting other groups.

>Inheretence

Take a look at the inheritance

With the hierarchical setup, Mobile Manager sets policies via inheritance. By default, when you configure a setting, it automatically applies the setting to all the child groups beneath it. This allows for rapid configuration across your district, while still remaining agile, allowing individual groups to set up their own policies.

>Inheretence2

About Inheritance:

Similar to genetic inheritance, your groups are set up to inherit traits from their parent group and pass those settings on to their child groups. Unlike genetics, if you want to change the settings for a particular group, you can!

Locking Policies

If you wish to impose settings on a group or groups, and thereby not allow them to alter the inherited configuration, you can easily lock the policy setting.

>Inheretence3

Multiple Groups

Devices can be in many groups at once. If, for example, as shown in the figure above, a device is in Group F it would inherit settings from Groups C and A. The device will only show a single group. This is because Mobile Manager will now compile all groups’ settings into a single profile for the device to make changes show on the devices faster.

Devices get the lowest settings on the tree. For example, if “Allow use of camera” is disabled in group A but is enabled in group G, then cameras will be enabled unless “Allow use of camera” is locked in group A.

When an administrator applies a restriction or allowance to a group, the users will pick up the nearest applicable policy on the hierarchical structure. If there is a conflicting change that has been made by two administrators at the same hierarchical level, then the most restrictive policy is applied.

Watch: An overview of the Mobile Manager inheritance interface.

Learn more about hierarchy with restrictions in the following walkthrough:  https://launch.lightspeedsystems.com/?walkme=165286

How Support Works

$
0
0

Welcome

It is our pleasure to welcome you to Lightspeed Systems and the Lightspeed Systems Global Technical Support organization, where customer satisfaction is our primary objective. A worldwide team of highly trained and experienced technical support engineers backs Lightspeed Systems solutions. With operations around the globe, we provide our customers with products and services required to help manage the risks of Internet browsing, ensure safe and productive use of the Internet (including email), and provide protection for critical systems and information. We also ensure that our solutions provide features that empower teachers within the classroom. To maximize the value our customers receive from Lightspeed Systems Global Technical Support, we have created this User Guide to help you become familiar with our support offerings, programs, services, and procedures. The most current information pertinent to each item below can be found on our Community Site. Please check there for the most current information regarding Lightspeed Systems Global Technical Support.

Technical Support Overview

Lightspeed Systems Global Technical Support Program

Lightspeed Systems Technical Support is included with every Lightspeed Systems product subscription. This includes unlimited 24×7 access to Lightspeed Systems Support, the Lightspeed Systems knowledgebase and product documentation from our Community site. During your subscription term, these resources enable you to submit your support cases; take advantage of the latest security features; download software, upgrades, updates and patches; and review Lightspeed Systems product documentation.

Normal business hours are defined as:

  • Monday – Friday 12:00 am to 5:00 pm Pacific Time

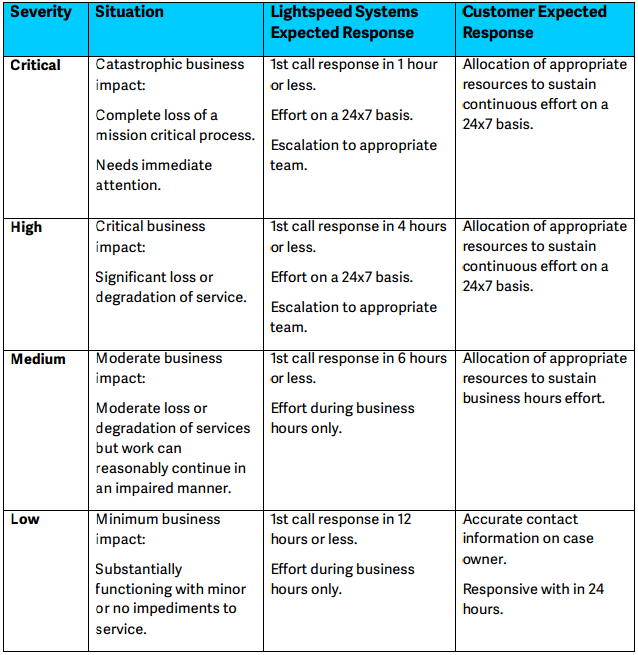
Response times and expected support experience are as follows:

screenshot-files.lightspeedsystems.com.s3.amazonaws.com 2016-04-29 08-10-27

Additional and up-to-date information about Lightspeed Systems Global Support Programs is located at our Community technical support site: http://community.lightspeedsystems.com/support

Hardware Support

Support for hardware is included for all hardware purchased from Lightspeed Systems. Support for hardware is available only during the warranty period and a valid software license is required. Hardware support includes the following:

  • Repair or replacement of defective hardware materials and workmanship, including internal peripherals, during the warranty period. Advance Server Replacement is used for any RMA action covered under warranty
  • “Retain your hard drive” capability in the event of hard drive failure and replacement
  • Telephone-based troubleshooting

On-site support provided by a Lightspeed Systems authorized service technician is available for an additional charge.

Getting Started With Support

Community Account ID

To take full advantage of Lightspeed Systems Global Technical Support services, start by creating a Lightspeed Systems Community site user account. You can create an account here: https://community.lightspeedsystems.com/register/

Lightspeed Systems Customer Support

In order to protect student and staff data, in addition to supplying other customer information, you must identify yourself when calling Lightspeed Systems Customer Support. Only users designated by you as “Support Entitled Users” (SEUs) are allowed to create a support ticket or request an update on an existing ticket. When creating a new support ticket either by phone, chat, email or the web, you will be asked to identify yourself and your organization. This process is designed to ensure access is provided solely to individuals authorized by you.

Scope of Lightspeed Systems Global Technical Support

Technical Support Includes:

  • Support for Lightspeed Systems product and services versions, as defined in the Tech Support Entitlement Matrix.
  • Help with questions and product behavior issues pertaining to supported Lightspeed Systems products and services in areas of:
    • Installation
    • Deployment
    • Administration and configuration
    • Maintenance and upgrade
    • Features and functionality

Hardware support will only be provided for hardware that has not been damaged as a result of external forces or conditions such as accidents, abuse, misuse, an unstable environment or power source, or natural disasters. Hardware support will not be provided if:

  • Hardware (or software) is repurposed or modified from its original configuration
  • Hardware has missing or altered serial numbers or service tags
  • Hardware has been serviced by someone other than a Lightspeed Systemsauthorized service provider
  • Lightspeed Systems product subscription has expired
  • Please check the Lightspeed Systems global technical support website for the most current hardware policy

Technical Support Excludes:

  • Support for uncertified architectures, platforms, or configurations Lightspeed Systems
  • Support for Lightspeed Systems products and versions that have passed their published End of Support (EOS) and End of Life (EOL) dates
  • http://community.lightspeedsystems.com/knowledgebase/lightspeed-systemsproduct-lifecycle-overview/
  • Diagnosis or support of third-party products and enabling software (e.g., operating systems and network software)
  • Problems caused by damaged software or use or modification of software, not as provided in the software documentation.

Certified Product Listing

Lightspeed Systems maintains a list of release notes and currently certified product configurations, which can be found on our Community Site. For Lightspeed Systems customers with valid product subscriptions who are running non-certified configurations, Lightspeed Systems will use commercially reasonable efforts to investigate potential issues with Lightspeed Systems software running together with these non-certified configurations. As part of the investigation, Lightspeed Systems may require the issue to be reproduced by the customer independently to isolate the issue from the non-certified configuration. Where issues are confirmed to be unrelated to the non-certified configuration, Lightspeed Systems will support its software in a manner that is consistent with support provided on Lightspeed Systems-certified configurations. Where issues are known, or proven to be directly related to the non-certified configuration, Lightspeed Systems will require the customer to migrate to a certified configuration.

Contacting Lightspeed Systems Global Technical Support

Lightspeed Systems Global Technical Support offers customers and partners our highest level of service. You can receive support via phone, email, chat or online at community.lightspeedsystems.com by using our extensive self-service resources.

Support Online

Log in to our Support Request Portal at community.lightspeedsystems.com/support with your Lightspeed Systems Community user credentials. Here, you will find links for contacting us via chat or to create a new case via email or web form.

Support by Phone

Call one of our offices during the business hours (listed above in the Technical Support Overview). You will be routed to the first available technician.

Local Language Support

Lightspeed Systems technical support is delivered primarily in English. While we cannot guarantee local language support in all instances, best effort local language support is available as follows:

screenshot-files.lightspeedsystems.com.s3.amazonaws.com 2016-04-29 08-23-19

Support in additional languages may be available through our certified regional resellers. We are working to add support in additional languages.

Software Support Request Procedure

To report an issue, you can contact us online or by phone. In order to efficiently resolve problems, it is important that there be clear and effective communication between you and Lightspeed Systems. The first step of the process requires you to accurately report the problem. To begin, you will need to provide us with at least the following information to initiate the process outlined in this User Guide:

  • Customer name
  • Customer serial number
  • Technical contact information, including: name, telephone number, and email address
  • Preliminary assessment of the scope and severity of the problem, including the number of affected appliances/users/seats Lightspeed Systems
  • Additional details and files needed to resolve the issue, as requested by us

When opening a support request, a case number will be assigned and provided to you. Retain and use this case number in order to facilitate future communications with us regarding the matter.

Having the information below to provide to the technician is not mandatory, but it can greatly improve the response time.

  • Existing case number (if you are calling about an existing case). The case number is found on your case confirmation email.
  • Product version and patch levels for all Lightspeed Systems servers
  • Network topology
  • Deployment and system configuration of all Lightspeed Systems servers and network components (i.e., directory, database, gateway, reporting servers, operating systems, etc.)
  • Documentation of initial symptoms and impacts (i.e., log files, screen shots, trace files, etc.)
  • Identification of changes made to your environment prior to manifestation of the problem

In addition, we expect you to participate in problem resolution in the following manner:

  • Provide a timely response to inquiries for technical information, including current status of issue, recommended fixes, and deployed patches
  • Have proper technical personnel available for consultation, further testing, and diagnosis, as needed
  • Gather log files and data, as requested by us
  • Participate in conference calls as needed

Case Closure Policy

Cases are closed and casework is ceased according to the following criteria:

Standard Case Closure

Your confirmation that the case is resolved and can be closed because an acceptable workaround or solution has been provided.

Non-Standard Case Closure

  • We will close the case if you do not respond to repeated inquiries by our technicians to confirm whether the problem has been satisfactorily resolved. We will make at least three attempts to contact you via phone and email before closing a case due to lack of customer response.
  • Your software license has expired.
  • We will reopen any case or may create a new case if you call to report the problem persists.

Enhancement and Feature Request Process

You can log product and service enhancements or new requests through the feature request forum:

http://community.lightspeedsystems.com/dev-hub/ – idea

You will need to log in with your Community credentials.

Technical Support Resources

Accessing our collection of online resources requires a Community site login account. If you don’t already have an account, create one at https://community.lightspeedsystems.com/register. Only SEUs are able to register for Community accounts.

Community

Log into the Community portal to obtain the latest product updates, hotfixes, and service packs, and access product-specific tools. You will need to create an account if you don’t already have one. To log in or create an account, go to http://community.lightspeedsystems.com.

Knowledgebase

Our customers use the Lightspeed Systems knowledgebase daily to find solutions to their common product problems. The Lightspeed Systems knowledgebase is kept Lightspeed Systems current with documentation, downloads, top articles, and product-specific solutions.

The knowledgebase is available by selecting your product on the Lightspeed Systems knowledgebase home page at http://community.lightspeedsystems.com/knowledgebase.

Customer Forum

Join our online community to share questions with and offer solutions and suggestions to other Lightspeed Systems customers regarding product best practices, deployment, installation, configuration and other product topics.

You can access the Lightspeed Systems-moderated forum at http://community.lightspeedsystems.com/knowledgebase/how-to-subscribe-tolistserv.

Tech Alerts

Subscribe to tech alerts and maintenance advisories to receive product alerts that automatically notify customers any time Lightspeed Systems issues new releases, critical hotfixes, or other important technical information.

Sign up now to receive tech alerts for your products from Lightspeed Systems. https://community.lightspeedsystems.com/your-profile/email-subscriptions/

Product Instructional Videos

Learn from our expert technicians about how to maximize the value of Lightspeed Systems products in your environment. A wealth of helpful information is available in the Training section of the Lightspeed Systems Community site at http://community.lightspeedsystems.com/training/library

Support Escalation Channels and Contacts

We are committed to solving every customer issue in a timely manner. If at any time you are not satisfied with the level of support that you received, you are encouraged to bring this to the attention of our support management team.

The technical support escalation path is as follows: Customer > Support Manager > Support Director > EVP, Global Operations and Customer Service.

Note: For immediate attention to your concerns, please ask for a manager when calling during supported business hours.

screenshot-files.lightspeedsystems.com.s3.amazonaws.com 2016-04-29 08-35-45


Article 0

$
0
0

Usage summary

Total quiz sessions:21
Average time spent per session:06:23
Total question answered:33
Average questions per session:2
Average skills per session:1

Number of tests attempted over time

16
1
1
1
1
1
July 2017 August 2017 September 2017 October 2017 December 2017 January 2018

Usage log

Date Quiz Score Total Points Session start time Session end time Time spentProblems attempted Skills/Question categories
January 2018
  - January 5, 2018 Selling Relay 0% 0 points 2:07 PM 3:31 PM 01:23 0 0
December 2017
  - December 19, 2017 Sales Benchmark #14 0% 0 points 3:45 PM 4:03 PM 00:17 0 0
October 2017
  - October 20, 2017 (Sales) Day Planning 0% 0 points 9:53 AM 1:05 PM 03:11 0 0
September 2017
  - September 18, 2017 Feature - Bridge - Benefit 0% 0 points 10:18 AM 5:06 PM 06:48 0 0
August 2017
  - August 8, 2017 (Sales) Smart Play 100% 30 points 8:09 AM 8:24 AM 00:15 2 1
July 2017
  - July 26, 2017 Sales Activities 100% 1 point 2:51 PM 3:04 PM 00:12 1 1
  - July 21, 2017 SF12 100% 2 points 9:33 AM 2:53 PM 05:19 2 1
  - July 21, 2017 SF10 50% 1 point 9:33 AM 10:02 AM 00:28 2 1
  - July 21, 2017 SF9 100% 2 points 9:33 AM 9:46 AM 00:13 2 1
  - July 21, 2017 SF8 100% 2 points 9:33 AM 9:33 AM 00:00:07 2 1
  - July 21, 2017 SF8 50% 1 point 9:33 AM 9:33 AM 00:00:10 2 1
  - July 21, 2017 SF8 0% 0 points 9:23 AM 9:32 AM 00:09:09 2 1
  - July 21, 2017 SF7 100% 2 points 9:23 AM 9:31 AM 00:08:07 2 1
  - July 21, 2017 SF6 100% 2 points 9:23 AM 9:23 AM 00:00:14 2 1
  - July 19, 2017 SF6 50% 1 point 3:37 PM 9:23 AM 17:46 2 1
  - July 19, 2017 SF5 100% 3 points 3:37 PM 9:11 AM 17:33 3 1
  - July 19, 2017 Welcome to Sales 100% 6 points 9:04 AM 4:59 PM 07:54 2 1
  - July 19, 2017 SF4 0% 0 points 3:37 PM 3:54 PM 00:17 2 1
  - July 19, 2017 SF3 100% 2 points 3:37 PM 3:50 PM 00:13 2 1
  - July 19, 2017 SF 2 100% 4 points 3:37 PM 3:42 PM 00:05:34 1 1
  - July 19, 2017 SF 1 100% 2 points 3:37 PM 3:39 PM 00:02:13 2 1

The post appeared first on Lightspeed Systems Community Site.

Viewing all 56 articles
Browse latest View live